How To Create Login And Registration Form Using HTML, CSS and JavaScript
In this article, we will learn step by step how to create a professional Login and Registration Form using HTML, CSS, and JavaScript. We will cover the complete code, explain how it works, and also share some extra features you can add to make the form more functional.
In today’s digital world, having a Login and Registration form on your website is essential. No matter if you are building an E-commerce website, a blogging platform, a social media website, or any kind of web application, you will always need a login and register system for user authentication.
If you are a beginner in web development, this project is perfect for you. By following this tutorial, you will not only be able to design a clean login form but also improve your knowledge of frontend development and JavaScript event handling.
Watch the Video Tutorial: Login And Registration Form
You can also watch the complete video tutorial on YouTube here:
Why Do We Need Login & Registration Forms?
Before jumping into coding, let’s understand why login and registration forms are so important.
- User Authentication – To verify a user’s identity before granting access.
- Data Security – Helps protect sensitive information like email, password, and user details.
- Personalized Experience – Logged-in users can access their personalized dashboards.
- User Engagement – Registered users spend more time and interact more with your website.
So, login and registration forms are not just a design element but a security and personalization tool for every serious website.
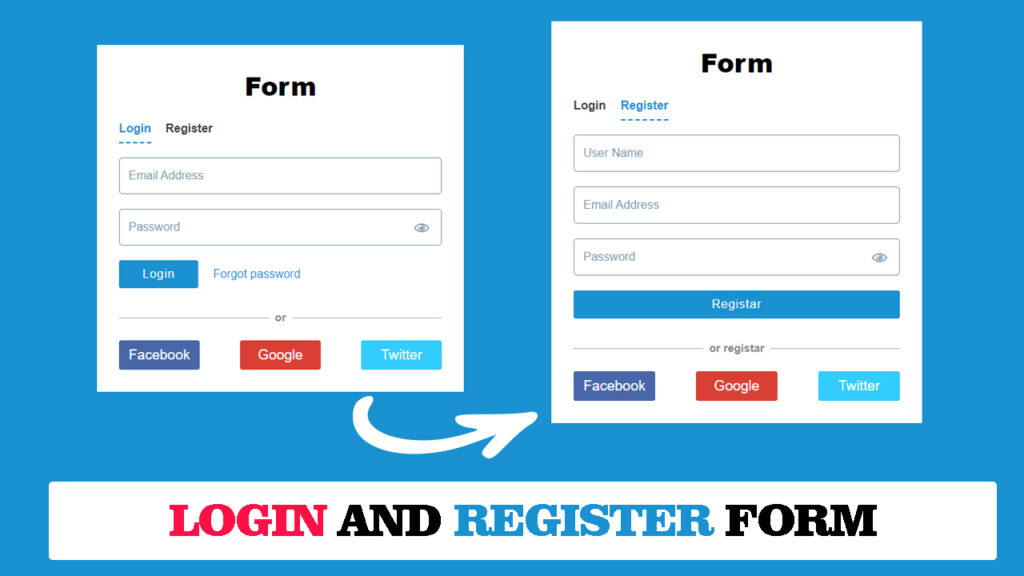
Features Of Our Login & Registration Form
The form we are about to build will have:
- A modern and clean design
- Login and Register options in the same page
- Responsive UI
- Social Media Login Buttons (Facebook, Google, Twitter)
Let’s get started step by step.
HTML Code:
We will first design the basic structure using HTML.
Here we will add two sections — one for Login and the other for Registration.
<!DOCTYPE html>
<html lang="en">
<head>
<meta charset="UTF-8">
<meta http-equiv="X-UA-Compatible" content="IE=edge">
<meta name="viewport" content="width=device-width, initial-scale=1.0">
<title>How To Create Login And Registration Form Using html css and javaScript</title>
<link rel="stylesheet" href="style.css">
</head>
<body>
<div class="form-wrapper">
<div class="form-container">
<h1 class="heading">Form</h1>
<ul class="nav-tab">
<li><a href="#" id="loginbtn" class="btnlist active">Login</a></li>
<li><a href="#" id="regbtn" class="btnlist">Register</a></li>
</ul>
<div class="form-tab">
<div id="loginForm" class="show">
<form action="">
<div class="input-box">
<input type="email" placeholder="Email Address">
</div>
<div class="input-box">
<span class="view">👁</span>
<input type="password" placeholder="Password">
</div>
<div class="btn-cont">
<button class="submite-btn">Login</button>
<a href="#" class="forget">Forgot password</a>
</div>
<div class="line">
<span>or</span>
</div>
<ul class="flow-btn-cont">
<li><a href="#" class="fa-btn">Facebook</a></li>
<li><a href="#" class="goog-btn">Google</a></li>
<li><a href="#" class="twit-btn">Twitter</a></li>
</ul>
</form>
</div>
<!-- ============================Registar====section=============== -->
<div id="registar">
<form action="">
<div class="input-box">
<input type="text" placeholder="User Name">
</div>
<div class="input-box">
<input type="email" placeholder="Email Address">
</div>
<div class="input-box">
<span class="view">👁</span>
<input type="password" placeholder="Password">
</div>
<div class="btn-cont">
<button class="submite-btn registar-btn">Registar</button>
</div>
<div class="line">
<span>or registar</span>
</div>
<ul class="flow-btn-cont">
<li><a href="#" class="fa-btn">Facebook</a></li>
<li><a href="#" class="goog-btn">Google</a></li>
<li><a href="#" class="twit-btn">Twitter</a></li>
</ul>
</form>
</div>
</div>
</div>
</div>
<!-- =====JavaScript==== -->
<script src="script.js"></script>
</body>
</html>CSS Code:
Next, let’s style our form so that it looks modern and professional.
* {
  margin: 0;
  padding: 0;
  box-sizing: border-box;
  font-family: Arial, Helvetica, sans-serif;
}

.form-wrapper {
  background-color: #1A91D1;
  display: flex;
  flex-direction: column;
  align-items: center;
  justify-content: center;
  min-height: 100vh;
  padding: 15px;
}

.form-container {
  background-color: #fff;
  max-width: 500px;
  width: 100%;
  padding: 30px;
}

.heading {
  text-align: center;
  font-size: 35px;
  font-weight: 800;
  word-spacing: 1px;
  margin-bottom: 25px;
}

.nav-tab {
  list-style: none;
  display: flex;
  flex-direction: row;
  gap: 20px;
  margin-bottom: 30px;
}

.nav-tab li .btnlist {
  text-decoration: none;
  color: #3b3b3b;
  padding-bottom: 10px;
  font-weight: 700;
}

.nav-tab li .btnlist.active {
  border-bottom: 2px dashed #1A91D1;
  color: #1A91D1;

}

form .input-box {
  position: relative;
  margin-bottom: 20px;
}

form .input-box input {
  width: 100%;
  height: 50px;
  line-height: 50px;
  padding-left: 12px;
  font-size: 16px;
  color: #829ab0;
  border: 1px solid #829ab0;
  border-radius: 5px;
  -webkit-border-radius: 5px;
  -moz-border-radius: 5px;
  -ms-border-radius: 5px;
  -o-border-radius: 5px;
}

form .input-box input::placeholder {
  color: #829ab0;
}

form .input-box input:focus {
  outline: none;
  border: 1px solid #1A91D1;
}

form .input-box .view {
  display: inline-block;
  position: absolute;
  right: 0;
  top: 0;
  color: #829ab0;
  bottom: 0;
  width: 40px;
  font-size: 25px;
  line-height: 50px;
  cursor: pointer;
}

.btn-cont {
  display: flex;
  flex-direction: row;
  flex-wrap: nowrap;
  gap: 20px;
  align-items: center;
}

.btn-cont .submite-btn {
  background-color: #1A91D1;
  color: #fff;
  border: none;
  padding: 10px 32px;
  font-size: 16px;
  font-weight: 400;
  letter-spacing: 1px;
  cursor: pointer;
  border-radius: 3px;
  -webkit-border-radius: 3px;
  -moz-border-radius: 3px;
  -ms-border-radius: 3px;
  -o-border-radius: 3px;
}

.forget {
  color: #1A91D1;
  text-decoration: none;
}

.forget:hover {
  text-decoration: underline;
}

.line {
  height: 1px;
  text-align: center;
  margin-top: 40px;
  background-color: #b0b0b0;
  margin-bottom: 30px;
}

.line span {
  background-color: #fff;
  padding: 8px;
  position: relative;
  top: -9px;
  font-size: 15px;
  font-weight: 600;
  color: #878484;
}

.flow-btn-cont {
  display: flex;
  flex-direction: row;
  flex-wrap: wrap;
  justify-content: space-between;
  list-style: none;
  gap: 10px;
}

.flow-btn-cont li a {
  display: inline-block;
  width: 110px;
  height: 40px;
  line-height: 40px;
  text-align: center;
  text-decoration: none;
  font-size: 19px;
  color: #fff;
  border-radius: 3px;
  -webkit-border-radius: 3px;
  -moz-border-radius: 3px;
  -ms-border-radius: 3px;
  -o-border-radius: 3px;
}

.flow-btn-cont li a.fa-btn {
  background-color: #4866a8;
}

.flow-btn-cont li a.goog-btn {
  background-color: #da3f34;
}

.flow-btn-cont li a.twit-btn {
  background-color: #3cf;
}

.flow-btn-cont li a:hover {
  opacity: 0.9;
}

#loginForm,
#registar {
  display: none;
}

#registar .registar-btn {
  width: 100%;
}

#loginForm.show,
#registar.show {
  display: block;
}
JavaScript Code:
Now let’s switch between Login and Register forms using JavaScript.
const loginbtn = document.getElementById("loginbtn");
const regisbtn = document.getElementById("regbtn");
const loginShow = document.getElementById("loginForm");
const regShow = document.getElementById("registar");

loginbtn.addEventListener("click", () => {
  loginShow.classList.add("show");
  regShow.classList.remove("show");
  loginbtn.classList.toggle("active");
  regisbtn.classList.remove("active");
});

regisbtn.addEventListener("click", () => {
  regShow.classList.add("show");
  loginShow.classList.remove("show");
  loginbtn.classList.remove("active");
  regisbtn.classList.add("active");
});
Final Output
Once you put all the code together, you will have a modern login and registration form that:
- Shows the Login tab by default.
- Switches to the Registration tab when clicked.
- Has a professional look with CSS styling.
Conclusion
So in this tutorial, we have successfully created a Login and Registration form using pure HTML, CSS, and JavaScript.
This is a frontend-only project, which is great for beginners. But if you want to make it functional, you can connect it with a Backend (like PHP, Node.js, Firebase, or Python Django) and store user data in a database.
Start with this project, practice it, and then extend it for real-world use.