How to Create a Stylish File Upload Form Using HTML, CSS, and JavaScript
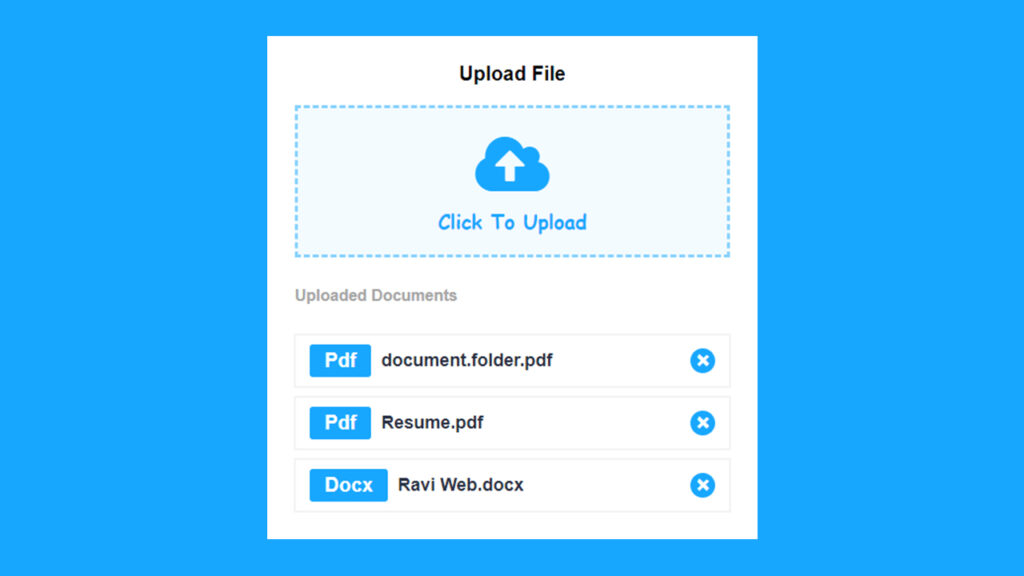
In this article, we will build a modern file upload form using HTML, CSS, and JavaScript. We will not only design it beautifully but also add interactive features like showing uploaded files and the option to remove them. By the end of this guide, you will have a professional-looking file upload section that you can easily integrate into your projects.
Uploading files is one of the most common features in web applications. Whether you are building a portfolio website, an admin dashboard, or a document submission portal, having a clean and user-friendly file upload interface makes a huge difference.
Why Build a Custom File Upload Form?
Most browsers provide a default file upload input, but it looks very basic and is not always user-friendly. With custom styling and JavaScript, we can:
- Improve the design and layout of the upload box.
- Show file names and types after uploading.
- Allow users to remove uploaded files.
- Restrict the upload to specific file types like
.doc,.docx, or.pdf.
Watch the Video Tutorial: File Upload Form Using HTML, CSS, and JavaScript
HTML Code:
Let’s start by creating the HTML file. Here’s the basic markup:
<!DOCTYPE html>
<html lang="en">
<head>
<meta charset="UTF-8">
<meta http-equiv="X-UA-Compatible" content="IE=edge">
<meta name="viewport" content="width=device-width, initial-scale=1.0">
<link rel="stylesheet" href="https://cdnjs.cloudflare.com/ajax/libs/font-awesome/4.7.0/css/font-awesome.min.css">
<title>How to Create Custom Multiple File Upload Using HTML CSS & JavaScript || Upload File Client-Side</title>
<link rel="stylesheet" href="style.css">
</head>
<body>
<div class="wrapper">
<div class="box">
<div class="input-bx">
<h2 class="upload-area-title">Upload File</h2>
<form action="">
<input type="file" id="upload" accept=".doc,.docx,.pdf" hidden>
<label for="upload" class="uploadlabel">
<span><i class="fa fa-cloud-upload"></i></span>
<p>Click To Upload</p>
</label>
</form>
</div>
<div id="filewrapper">
<h3 class="uploaded">Uploaded Documents</h3>
<!-- <div class="showfilebox">
<div class="left">
<span class="filetype">Pdf</span>
<h3>Ravi Web.pdf</h3>
</div>
<div class="right">
<span>×</span>
</div>
</div> -->
</div>
</div>
</div>
<script src="script.js"></script>
</body>
</html>
Explanation:
- We use a hidden
<input type="file">and style it using a<label>element. - The Font Awesome icon (
fa-cloud-upload) makes the upload section visually appealing. - The
accept=".doc,.docx,.pdf"attribute ensures that only Word and PDF files can be uploaded. - A
<div id="filewrapper">is added to display the uploaded file details later.
CSS Code:
The CSS code makes our form look modern and responsive:
*{
  margin: 0;
  padding: 0;
  box-sizing: border-box;
  font-family: Arial, Helvetica, sans-serif;
}

.wrapper{
  display: flex;
  justify-content: center;
  align-items: center;
  padding: 15px;
  width: 100%;
  min-height: 100vh;
  background: #5691d5;
  background: linear-gradient(282deg, #009dff 0%, #54bdff);
}
.box{
  max-width: 500px;
  background: #fff;
  padding: 30px;
  width: 100%;
  border-radius: 5px;
  -webkit-border-radius: 5px;
  -moz-border-radius: 5px;
  -ms-border-radius: 5px;
  -o-border-radius: 5px;
}

.upload-area-title{
  text-align: center;
  margin-bottom: 20px;
  font-size: 20px;
  font-weight: 600;
}
.uploadlabel{
  width: 100%;
  min-height: 100px;
  padding: 20px;
  background: #18a7ff0d;
  display: flex;
  flex-direction: column;
  justify-content: center;
  align-items: center;
  border: 3px dashed #18a7ff82;
  cursor: pointer;
}
.uploadlabel span{
  font-size: 70px;
  color: #18a7ff;
}
.uploadlabel p{
  color: #18a7ff;
  font-size: 20px;
  font-weight: 800;
  font-family: cursive;
}
.uploaded{
  margin: 30px 0;
  font-size: 16px;
  font-weight: 700;
  color: #a5a5a5;
}

.showfilebox{
  display: flex;
  align-items: center;
  justify-content: space-between;
  margin: 10px 0;
  padding: 10px 15px;
  box-shadow: #0000000d 0px 0px 0px 1px,
  #d1d5db3d 0px 0px 0px 1px inset;
}
.showfilebox .left{
  display: flex;
  align-items: center;
  flex-wrap: wrap;
  gap: 10px;
}

.filetype{
  background: #18a7ff;
  color: #fff;
  padding: 5px 15px;
  font-size: 20px;
  text-transform: capitalize;
  font-weight: 700;
  border-radius: 3px;
  -webkit-border-radius: 3px;
  -moz-border-radius: 3px;
  -ms-border-radius: 3px;
  -o-border-radius: 3px;
}

.left h3{
  font-weight: 600;
  font-size: 18px;
  color: #292F42;
  margin: 0;
}
.right span{
  background: #18a7ff;
  color: #fff;
  width: 25px;
  height: 25px;
  font-size: 25px;
  line-height: 25px;
  display: inline-block;
  text-align: center;
  font-weight: 700;
  cursor: pointer;
  border-radius: 50%;
  -webkit-border-radius: 50%;
  -moz-border-radius: 50%;
  -ms-border-radius: 50%;
  -o-border-radius: 50%;
}
Explanation:
- The
wrapperuses flexbox to center the form both vertically and horizontally. - The upload box has a dashed border to make it look like a drop area.
- Uploaded files are displayed inside a styled container with the file type highlighted.
- A small delete (×) button lets users remove files from the list.
JavaScript Code:
Now, let’s write the JavaScript to make it functional:
window.addEventListener("load",()=>{
  const input = document.getElementById("upload");
  const filewrapper =document.getElementById("filewrapper");

  input.addEventListener("change",(e)=>{
    let fileName = e.target.files[0].name;
    let filetype= e.target.value.split(".").pop();
    fileshow(fileName, filetype);
  })

  const fileshow=(fileName, filetype)=>{
    const showfileboxElem= document.createElement("div");
    showfileboxElem.classList.add("showfilebox");
    const leftElem = document.createElement("div");
    leftElem.classList.add("left");
    const fileTypeElem = document.createElement("span");
    fileTypeElem.classList.add("filetype");
    fileTypeElem.innerHTML=filetype;
    leftElem.append(fileTypeElem);
    const filetitleElem = document.createElement("h3");
    filetitleElem.innerHTML=fileName;
    leftElem.append(filetitleElem);
    showfileboxElem.append(leftElem);
    const rightElem = document.createElement("div");
    rightElem.classList.add("right");
    showfileboxElem.append(rightElem);
    const crossElem =document.createElement("span");
    crossElem.innerHTML="×";
    rightElem.append(crossElem);
    filewrapper.append(showfileboxElem);

    crossElem.addEventListener("click",()=>{
      filewrapper.removeChild(showfileboxElem);
    })
  }

})
Explanation:
- When a file is selected, the script reads its name and type.
- A new file box is created dynamically showing these details.
- The delete button (×) removes the file from the list without reloading the page.
Benefits of This File Upload System
- Clean UI: Users get a simple, modern upload interface.
- File Restrictions: Only
.doc,.docx, and.pdffiles are allowed. - Dynamic Updates: Files appear instantly without reloading the page.
- File Removal: Users can easily remove uploaded files.
Real-World Use Cases
- Resume or CV submission on career websites.
- Uploading project reports for educational portals.
- File sharing in admin dashboards.
- Document verification systems.
Conclusion
Building a file upload form doesn’t have to be complicated. With just HTML, CSS, and a little JavaScript, we can create a professional and interactive upload interface that looks good and works smoothly.
This example can be customized for different projects. You can extend it to allow multiple file uploads, drag-and-drop functionality, or backend storage using PHP or Node.js.
If you are a beginner, this project is a great way to practice DOM manipulation, CSS styling, and event handling in JavaScript.