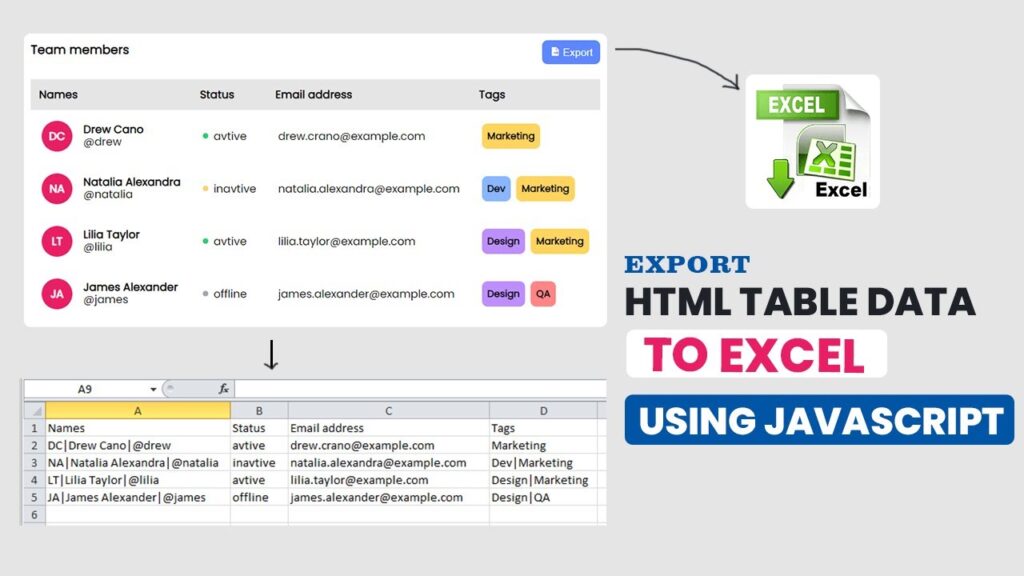
HTML Table to Excel JavaScript – Export Table Data Easily
In this guide, we will walk step by step on how to implement HTML table to Excel JavaScript without using any third-party library. If you love building projects like this, check out our JavaScript Category. Yes, you heard it right – just pure vanilla JavaScript running on the client side.
Exporting table data to Excel is one of the most common requirements in web development. Whether you are building an admin dashboard, a reporting tool, or a student record system, there is often a need to download HTML table data as an Excel file.
By the end of this article, you will:
- Understand why HTML table to Excel JavaScript is important.
- Learn how to export a table as CSV format that opens directly in Excel.
- Get clean, production-ready code with explanations.
Watch the Video Tutorial: HTML Table to Excel JavaScript
Why Do We Need HTML Table to Excel JavaScript?
- Export attendance reports.
- Download employee lists.
- Save sales records for offline usage.
- Generate student performance sheets.
Instead of manually copying data, a one-click Export button makes life easier. That’s where HTML table to Excel JavaScript comes in.
How Does HTML Table Export Work?
Before jumping into code, let’s understand the logic:
- Read the HTML Table – Get all rows and cells from the
<table>. - Convert Data to CSV Format – Convert each cell’s text into a comma-separated string.
- Generate Download Link – Use JavaScript to create a data URI for the CSV.
- Trigger Download – Simulate a click event to download the file as
.csv.
This CSV file can be easily opened in Excel, Google Sheets, or any spreadsheet software. You can explore more similar projects in our Code Projects category.
Step-by-Step Implementation
Let’s build a working example of exporting HTML table data to Excel using JavaScript.
HTML Code:
<!DOCTYPE html>
<html lang="en">

<head>
  <meta charset="UTF-8">
  <meta name="viewport" content="width=device-width, initial-scale=1.0">
  <title>Export HTMl Table to Excel Using JavaScript </title>
  <!-- =======boxicons link===== -->
  <link href='https://unpkg.com/boxicons@2.1.4/css/boxicons.min.css' rel='stylesheet'>
  <link rel="stylesheet" href="style.css">
</head>

<body>

  <div class="table-wrapper">
    <div class="caption">
      <h2>Team Members</h2>
      <button class="export-btn" type="button"> <i class="bx bxs-file-export"></i> Export</button>
    </div>

    <table>
      <thead>
        <tr>
          <th>Names</th>
          <th>Status</th>
          <th>Email address</th>
          <th>Tags</th>
        </tr>
      </thead>

      <tbody id="team-member-row">
        <!-- ----------table row start------- -->
        <tr>
          <td class="team-member-profile">
            <span class="profile-pic">DC</span>
            <div class="profile-info">
              <div class="profile-info-name">
                Drew Cano
              </div>
              <div class="profile-info-alias">
                @drew
              </div>
            </div>
          </td>

          <td>
            <div class="status">
              <div class="status-circle status-active"></div>
              active
            </div>
          </td>

          <td>
            drew.cano@examole.com
          </td>
          <td>
            <div class="tags">
              <div class="tag tag-marketing">
                Marketing
              </div>
            </div>
          </td>
        </tr>
        <!-- ----------table row end------- -->

        <!-- ----------table row start------- -->
        <tr>
          <td class="team-member-profile">
            <span class="profile-pic">NA</span>
            <div class="profile-info">
              <div class="profile-info-name">
                Natalis Alexandra
              </div>
              <div class="profile-info-alias">
                @natais
              </div>
            </div>
          </td>

          <td>
            <div class="status">
              <div class="status-circle status-inactive"></div>
              inactive
            </div>
          </td>

          <td>
            natalis.alexandra@examole.com
          </td>
          <td>
            <div class="tags">
              <div class="tag tag-dev">
                Dev
              </div>
              <div class="tag tag-marketing">
                Marketing
              </div>
            </div>
          </td>
        </tr>
        <!-- ----------table row end------- -->

        <!-- ----------table row start------- -->
        <tr>
          <td class="team-member-profile">
            <span class="profile-pic">LT</span>
            <div class="profile-info">
              <div class="profile-info-name">
                Lilia Taylor
              </div>
              <div class="profile-info-alias">
                @lilia
              </div>
            </div>
          </td>

          <td>
            <div class="status">
              <div class="status-circle status-active"></div>
              active
            </div>
          </td>

          <td>
            lilia.taylor@examole.com
          </td>
          <td>
            <div class="tags">
              <div class="tag tag-design">
                Design
              </div>
              <div class="tag tag-marketing">
                Marketing
              </div>
            </div>
          </td>
        </tr>
        <!-- ----------table row end------- -->

        <!-- ----------table row start------- -->
        <tr>
          <td class="team-member-profile">
            <span class="profile-pic">JA</span>
            <div class="profile-info">
              <div class="profile-info-name">
                James Alexander
              </div>
              <div class="profile-info-alias">
                @james
              </div>
            </div>
          </td>

          <td>
            <div class="status">
              <div class="status-circle status-offline"></div>
              offline
            </div>
          </td>

          <td>
            james.alexander@examole.com
          </td>
          <td>
            <div class="tags">
              <div class="tag tag-design">
                Design
              </div>
              <div class="tag tag-qa">
                QA
              </div>
            </div>
          </td>
        </tr>
        <!-- ----------table row end------- -->
      </tbody>
    </table>
  </div>


  <script src="script.js"></script>
</body>

</html>
CSS Code:
/* ===google fonts==== */
@import url('https://fonts.googleapis.com/css2?family=Poppins&display=swap');

* {
  margin: 0;
  padding: 0;
  box-sizing: border-box;
}

body {
  font-family: 'Poppins', sans-serif;
  background-color: #E5E5E5;
  display: flex;
  justify-content: center;
  align-items: center;
  height: 100vh;
}

.table-wrapper {
  background-color: #fff;
  border-radius: 10px;
  padding: 10px;
  text-align: left;
  overflow-x: auto;
  user-select: none;
}

.caption {
  display: flex;
  justify-content: space-between;
}

.caption h2 {
  font-size: 18px;
  font-weight: 600;
}

.export-btn {
  white-space: nowrap;
  margin-bottom: 2px;
  padding: 8px 10px;
  border-radius: 8px;
  color: white;
  background-color: #5d87ff;
  border: 1px solid transparent;
  cursor: pointer;
  font-size: 15px;
  transition: all 0.3s;
}

.export-btn:hover {
  border: 1px solid #5d87ff;
  color: #5d87ff;
  background-color: #fff;
}

.table-wrapper table {
  max-width: fit-content;
  margin-top: 20px;
  border-collapse: collapse;
  border-radius: 15px;
}

.table-wrapper thead tr {
  background: #E5E5E5;
}

.table-wrapper th {
  padding: 10px 12px;
}

.table-wrapper td {
  padding: 1rem;
  background: transparent;
  vertical-align: middle;
}

.table-wrapper tbody tr {
  transition: all 0.3s;
}

.team-member-profile {
  display: flex;
  align-items: center;
  gap: 1rem;
}

.profile-pic {
  width: 45px;
  height: 45px;
  border-radius: 50%;
  background-color: #e91e63;
  display: flex;
  justify-content: center;
  align-items: center;
  color: #fff;
  font-weight: 600;
}

.profile-info {
  display: flex;
  flex-direction: column;
  line-height: 115%;
}

.profile-info-name {
  font-weight: 700;
  white-space: nowrap;
}

.status {
  display: flex;
  font-weight: 700px;
  gap: 0.5rem;
  align-items: center;
}

.status-circle {
  display: inline-block;
  height: 0.5rem;
  width: 0.5rem;
  border-radius: 50%;
}

.status-active {
  background: #2ECC71;
}

.status-inactive {
  background: #ffd071;
}

.status-offline {
  background: #ADA7B1;
}

.tags {
  display: flex;
  gap: 0.5rem;
}

.tag {
  padding: 0.5rem;
  border-radius: 0.5rem;
  font-weight: 700;
  font-size: 14px;
}

.tag-marketing {
  background: #ffd45e;
}

.tag-dev {
  background: #89b6ff;
}

.tag-design {
  background: #bd8eff;
}

.tag-qa {
  background: #ff8585;
}
JavaScript Code:
const exportButon = document.querySelector(".export-btn");

const exportHTMLTableToCSV = (selctor) => {
  // parse table for data
  const table = document.querySelector(selctor);
  const rows = Array.from(table.rows);
  const teamMembers = rows.map((row) =>
    Array.from(row.cells).map(
      //if cell have multiple values use pipe symbol
      (cell) => cell.innerText.replace(/\n/g, "|")
    )
  );

  //construct CSV

  const csvContent =
    "data:text/csv;charset=utf-8," +
    teamMembers
      .map((teamMember) => Object.values(teamMember).join(","))
      .join("\n");
  // name file and download
  const encodedUri = encodeURI(csvContent);
  const link = document.createElement("a");
  link.setAttribute("href", encodedUri);
  link.setAttribute("download", "team-members.csv");
  document.body.append(link);
  link.click();
};
exportButon.addEventListener("click", function () {
  exportHTMLTableToCSV(".table-wrapper > table");
});
Why CSV for Excel Export?
While it’s possible to generate .xlsx files, using CSV has several benefits:
- Simple and lightweight.
- Works on all browsers.
- No dependency on third-party libraries.
- Opens directly in Excel, Google Sheets, or LibreOffice.
If you need advanced formatting, you can use libraries like SheetJS (XLSX.js). But for most use cases, HTML table to Excel JavaScript using CSV is enough.
Advantages of Using Vanilla JavaScript
- No external library required.
- Faster execution.
- 100% client-side (no server processing needed).
- Works in modern browsers without issues.
This makes it the best solution if you are targeting performance and simplicity.
Real-World Use Cases
- School Management System – Export student attendance.
- HR Software – Download employee records.
- E-commerce Dashboard – Export order history.
- Hospital System – Export patient records.
In all these scenarios, using HTML table to Excel JavaScript helps end users get quick offline reports.
Conclusion
In this article, we explored how to implement HTML table to Excel JavaScript without using any external library. This lightweight client-side solution is perfect for quick exports in admin panels, dashboards, and reporting tools.
With just a few lines of vanilla JavaScript, you can:
- Export table data.
- Download it as CSV.
- Open it directly in Excel.
Now you can easily integrate this into your projects and provide your users with a professional export feature.