Step-by-Step Guide: Create a Custom Drag and Drop File Upload Using HTML, CSS & JavaScript
A custom drag and drop file upload is an essential feature for modern websites. Whether your website is a portfolio, project management app, or any platform requiring file uploads, offering an intuitive and responsive upload interface improves the user experience significantly.
In this guide, we’ll walk you through creating a fully custom drag-and-drop file upload component using HTML, CSS, and JavaScript. Users can choose files by clicking or simply dragging them into a specified upload box, while instantly seeing details like file name and size.
By the end of this tutorial, you’ll have a fully functional, responsive, and visually appealing file upload component that you can integrate into any website.
Watch the Video Tutorial: Create a Custom Drag & Drop File Upload
Why Drag & Drop File Upload is Important
In most traditional file upload setups, users have to click a button to browse and select files from their devices. While this works, it’s not very interactive and can feel outdated.
Drag-and-drop upload areas improve the user experience because:
- Users can drag files directly into the upload zone.
- Immediate feedback shows file names, sizes, and upload progress.
- The process is faster and more visually appealing than standard file input fields.
Key Features of Our Custom File Upload
Our example will include:
- Click or Drag & Drop: Users can click the area to select files or drag files into it.
- Real-Time Feedback: The selected file name and size will display instantly.
- Highlighting on Drag: The upload area changes visually when files are dragged over it.
- Cancel Button: Users can reset the selection if they change their mind.
For more input handling ideas, check out our Responsive Registration Form in HTML & CSS
HTML Code:
Here’s the layout for the drag-and-drop uploader:
<!DOCTYPE html>
<html lang="en">
<head>
<meta charset="UTF-8">
<meta name="viewport" content="width=device-width, initial-scale=1.0">
<title>How to Create Custom Drag and Drop File Upload & Attachment Using HTML, CSS, & JavaScript</title>
<!-- ------Box Icon--------- -->
<link href='https://unpkg.com/boxicons@2.1.4/css/boxicons.min.css' rel='stylesheet'>
<link rel="stylesheet" href="style.css">
</head>
<body>
<div class="wrapper">
<form action="" class="dropbox-zone">
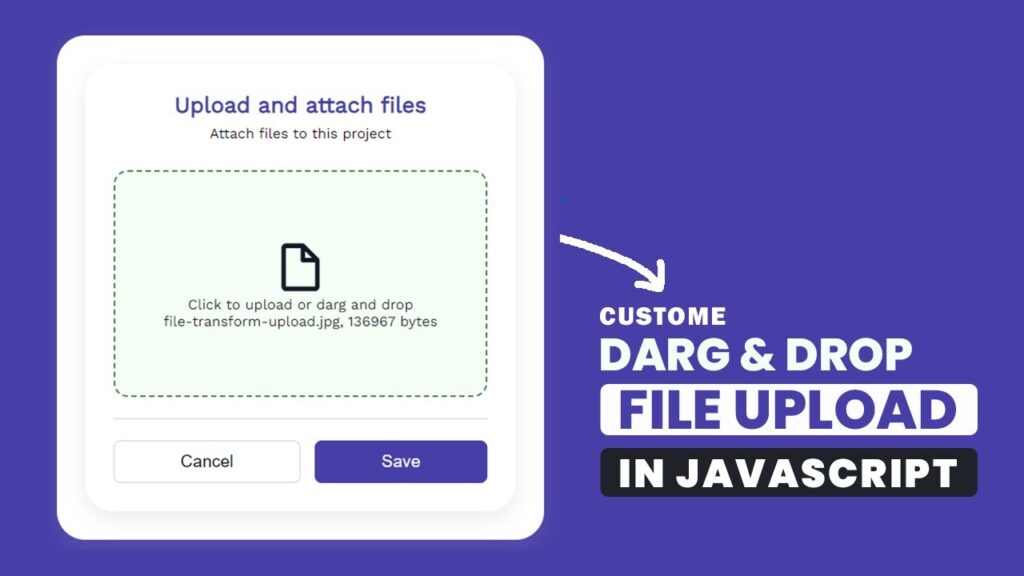
<h2>Upload and attach files</h2>
<p>Attach files to this project</p>
<div class="droparea-zone">
<div class="upload-icon-file">
<i class="bx bx-file-blank"></i>
</div>
<p>Click to upload or darg and drop</p>
<input type="file" required id="upload-file" name="upload-file">
<p class="message">No Files Selected</p>
</div>
<div class="dropactions-zone">
<button type="reset">Cancel</button>
<button id="submit-button" type="submit">Save</button>
</div>
</form>
</div>
<script src="script.js"></script>
</body>
</html>Explanation:
dropbox-zonecontains the file uploader and action buttons.droparea-zonehas an icon and a placeholder message for file details.- The file input element is kept invisible yet still functions when clicked, ensuring a smooth user experience.
CSS Code:
/* ==========Font Family===== */
@import url('https://fonts.googleapis.com/css2?family=Work+Sans&display=swap');

* {
    margin: 0;
    padding: 0;
    box-sizing: border-box;
}

body {
    font-family: "Work sans", sans-serif;
    background-color: #483EA8;
    display: flex;
    justify-content: center;
    align-items: center;
    height: 100vh;
    padding: 16px;
}

.wrapper {
    border-radius: 2rem;
    background-color: #fff;
    max-width: 550px;
    width: 100%;
    display: flex;
    justify-content: center;
    flex-direction: column;
    padding: 2rem;
    box-shadow: rgba(149, 157, 165, 0.2) 0px 8px 24px;
}

.dropbox-zone {
    border-radius: 2rem;
    padding: 2rem;
    box-shadow: rgba(149, 157, 165, 0.2) 0px 8px 24px;
    display: flex;
    justify-content: center;
    flex-direction: column;
    max-width: 550px;
    width: 100%;
    background-color: #fff;
    text-align: center;
}

.dropbox-zone h2 {
    font-size: 25px;
    margin-bottom: 0.5rem;
    color: #483EA8;
}

.droparea-zone {
    padding: 1rem;
    position: relative;
    margin-top: 2rem;
    min-height: 16rem;
    display: flex;
    align-items: center;
    justify-content: center;
    flex-direction: column;
    border: 2px dashed #483EA8;
    border-radius: 1rem;
    color: #111926;
    cursor: pointer;
}

.droparea-zone .upload-icon-file i {
    font-size: 65px;
    color: #111926;
}

.droparea-zone [type="file"] {
    position: absolute;
    cursor: pointer;
    opacity: 0;
    top: 0;
    right: 0;
    bottom: 0;
    left: 0;
}

.dropactions-zone {
    display: flex;
    justify-content: space-between;
    padding-top: 1.5rem;
    margin-top: 1.5rem;
    border-top: 1px solid #D3D3D3;
    gap: 1rem;
    flex-wrap: wrap;
}

.dropactions-zone button {
    flex-grow: 1;
    min-height: 3rem;
    font-size: 1.2rem;
}

.dropactions-zone button[type="reset"] {
    background-color: transparent;
    border: 1px solid #D3D3D3;
    border-radius: 0.5rem;
    padding: 0.5rem 1rem;
    cursor: pointer;
}

.dropactions-zone button[type="submit"] {
    background-color: #483EA8;
    color: #fff;
    border: 1px solid #483EA8;
    border-radius: 0.5rem;
    padding: 0.5rem 1rem;
    cursor: pointer;
}

.dropover-zone {
    border-style: solid;
    background-color: #F8F8FF;
}

.sucess {
    border-color: #598259;
    background-color: #e8ffe870;
}
JavaScript Code:
const dropBoxZone = document.getElementsByClassName("dropbox-zone")[0];
const inputFiles = document.querySelectorAll(".droparea-zone [type='file']");
const inputElement = inputFiles[0];
const dropZoneElement = inputElement.closest(".droparea-zone");

inputElement.addEventListener("change", (e) => {
  if (inputElement.files.length) {
    updateDropzoneFileList(dropZoneElement, inputElement.files[0]);
  }
  dropZoneElement.classList.add("sucess");
});

dropZoneElement.addEventListener("dragover", (e) => {
  e.preventDefault();
  dropZoneElement.classList.add("dropover-zone");
  dropZoneElement.classList.remove("sucess");
});

["dragleave", "dragend"].forEach((type) => {
  dropZoneElement.addEventListener(type, (e) => {
    dropZoneElement.classList.remove("dropover-zone");
  });
});

dropZoneElement.addEventListener("drop", (e) => {
  e.preventDefault();
  if (e.dataTransfer.files.length) {
    inputElement.files = e.dataTransfer.files;
    updateDropzoneFileList(dropZoneElement, e.dataTransfer.files[0]);
  }
  dropZoneElement.classList.remove("dropover-zone");
  dropZoneElement.classList.add("sucess");
});

const updateDropzoneFileList = (dropZoneElement, file) => {
  let dropzoneFileMessage = dropZoneElement.querySelector(".message");
  dropzoneFileMessage.innerHTML = `${file.name}, ${file.size} bytes`;
};

dropBoxZone.addEventListener("reset", (e) => {
  let dropzoneFileMessage = dropZoneElement.querySelector(".message");
  dropzoneFileMessage.innerHTML = `No Files Selected`;
  dropZoneElement.classList.remove("sucess");
});

dropBoxZone.addEventListener("submit", (e) => {
  e.preventDefault();
  const myFiled = document.getElementById("upload-file");
  console.log(myFiled.files[0]);
});
Step-by-Step Workflow
- Users open the page.
- Files can be clicked to select or dragged into the area.
- Selected files immediately show name and size.
- The Cancel button clears selection.
Benefits
- Interactive and modern UX
- Real-time file feedback
- Fully responsive design
- Maintainable and extendable code
- Easy integration with backend systems
Conclusion
Creating a custom drag-and-drop file uploader with HTML, CSS, and By incorporating JavaScript, we can make the upload process more interactive and responsive for users. It replaces boring file input buttons with a modern, intuitive interface.
You can further improve it by adding:
- File type restrictions
- Image previews
- Upload progress bars
- AJAX/Fetch API for real-time uploads
By implementing this, your website looks professional, user-friendly, and modern.